I'm moving things to the new Robot Ambassador website. So please check things there.
We will have a new Queen Creek Library event March 6th. It will be a soldering event to get people out and doing something new. Registration is required.
I didn't get things back on track after the holiday break and I apologize. We do have a new recurring schedule the First Thursday each month. We also do have specific hands on events for March and April.
Thursday, February 13, 2014
Thursday, November 21, 2013
Reminder Tonight!
Reminder that this is tonight. I have been killing robots to make a new hybrid version with better agility. Come check it out the destruction and fun. Tonight at from 5:30 to 8:00 pm at the Queen Creek Branch Library.
Sunday, November 3, 2013
Robox
Introducing Robox
Ever since I learned a little about Arduino at HeatSync Labs I've been excited to share how easy it is. In preparation for the first QC Robot Night I designed and built 8 robots. The goal was to have an Arduino and basic electronics for people to work with. This is intended to document what goes into these robots. It isn't a complete step by step instruction for making one. After I improve this robot design I may considering doing that. I do have a github with the Robox Code and Parts for those wanting to check it out.

A Light Controlled Robot
Robox is controlled with a flashlight. Shining the light on one of the photo resistors will trigger action (forward, right, or left). Arduino senses the voltage between 0-5 volts and gives it a number between 0-1023. A lot of analog sensors work in the same way and you can use them just as easily. The Robox code checks each sensor comparing it with the other two sensors. If one sensor is above both other sensors by a value of more than 100 it will take the specified action.
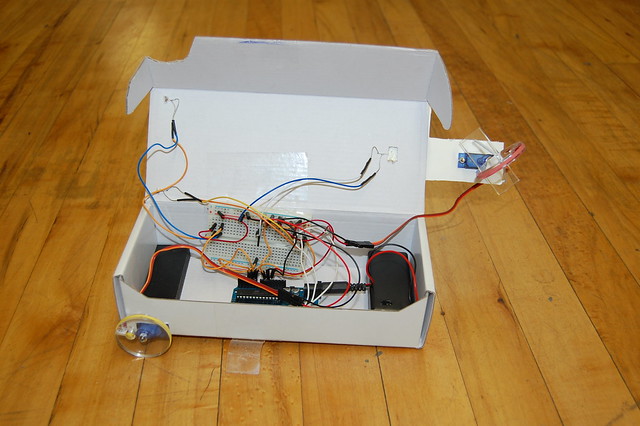
Here is a look inside Robox. The wires are a bit disorganized partly because they are meant to be taken apart and used for basic Arduino examples.
Reinventing the Wheel
To avoid spending over $40 on wheels I laser cut my own and used a rubber band around the outside for traction. The rubber band can be re-sized and placed over the wheel with the knot fit in the groove. This doesn't work very well. If you are only driving the robot it works pretty good. When people pick up the robots they have a tendency to create lateral movement and it occasionally pulls the rubber bands off. I have since added some glue (a messy process) and they seem to be holding up.

Design Breakdown
I purchased parts from a lot of different sources. Because I was buying 10 of each most of the prices were reduced from what I list here. If you have an Arduino kit you will already have some of these including a breadboard. Just check your kit and see what you need in addition.
Cardboard box: I got these for free and it's a great demonstrate that making things doesn't require expensive materials.
Micro Servo $3.99 and Continuous Rotation Micro Servo $4.99: Servos are very simple for new users, and avoid any concern of miss-wiring. I wanted to have each type of servo (180 rotation, and continuous rotation) in my kits. Unfortunately the design doesn't have a very good turn radius. I will probably redesign this with two drive wheels which is most common for that reason.
Arduino Uno Rev3 $25: Online tutorials usually demonstrate with Uno or similar.
Half size breadboard $5: Also to use with online tutorials or just in prototyping projects.
3 Photo Resistors $0.80: An inexpensive input sensor.
Jumper wire $4.95: I'm using few jumper wires in the robot, if you don't have them they will be needed for prototyping other things.
9V battery holder $3.95: Tried to avoid being too big or heavy. Turns out that having more weight could help with traction and the size wasn't a problem. I am switching to 4 AA batteries. I wouldn't recommend 9 volt batteries unless you really need that voltage and form factor. They don't have very good battery life. When using 9 Volts to supply 6 Volts a lot of the extra voltage is wasted as heat.
USB Cables $0.85: Needed for programming Arduino. A longer USB may be more convenient.
Custom laser cut wheels: I didn't want to buy 30 wheels for over a dollar each. There was scrap acrylic available so I took advantage of that. Look around for servo wheels and see what looks good. They will probably be better than lasercut wheels.
Total cost was between $45 - $50 per robot.
Challenges:
Lack of traction because it is too light weight.
Breadboards and jumper wires come loose.
Servo's not centering. More expensive servo's may work better.
Doesn't have a good turning radius as described above.
Robots do not obey the 3 laws of robotics due to their limited understanding of the English language. Does anyone have an Arduino library for this?
Ever since I learned a little about Arduino at HeatSync Labs I've been excited to share how easy it is. In preparation for the first QC Robot Night I designed and built 8 robots. The goal was to have an Arduino and basic electronics for people to work with. This is intended to document what goes into these robots. It isn't a complete step by step instruction for making one. After I improve this robot design I may considering doing that. I do have a github with the Robox Code and Parts for those wanting to check it out.
A Light Controlled Robot
Robox is controlled with a flashlight. Shining the light on one of the photo resistors will trigger action (forward, right, or left). Arduino senses the voltage between 0-5 volts and gives it a number between 0-1023. A lot of analog sensors work in the same way and you can use them just as easily. The Robox code checks each sensor comparing it with the other two sensors. If one sensor is above both other sensors by a value of more than 100 it will take the specified action.
Here is a look inside Robox. The wires are a bit disorganized partly because they are meant to be taken apart and used for basic Arduino examples.
Reinventing the Wheel
To avoid spending over $40 on wheels I laser cut my own and used a rubber band around the outside for traction. The rubber band can be re-sized and placed over the wheel with the knot fit in the groove. This doesn't work very well. If you are only driving the robot it works pretty good. When people pick up the robots they have a tendency to create lateral movement and it occasionally pulls the rubber bands off. I have since added some glue (a messy process) and they seem to be holding up.
Design Breakdown
I purchased parts from a lot of different sources. Because I was buying 10 of each most of the prices were reduced from what I list here. If you have an Arduino kit you will already have some of these including a breadboard. Just check your kit and see what you need in addition.
Cardboard box: I got these for free and it's a great demonstrate that making things doesn't require expensive materials.
Micro Servo $3.99 and Continuous Rotation Micro Servo $4.99: Servos are very simple for new users, and avoid any concern of miss-wiring. I wanted to have each type of servo (180 rotation, and continuous rotation) in my kits. Unfortunately the design doesn't have a very good turn radius. I will probably redesign this with two drive wheels which is most common for that reason.
Arduino Uno Rev3 $25: Online tutorials usually demonstrate with Uno or similar.
Half size breadboard $5: Also to use with online tutorials or just in prototyping projects.
3 Photo Resistors $0.80: An inexpensive input sensor.
Jumper wire $4.95: I'm using few jumper wires in the robot, if you don't have them they will be needed for prototyping other things.
9V battery holder $3.95: Tried to avoid being too big or heavy. Turns out that having more weight could help with traction and the size wasn't a problem. I am switching to 4 AA batteries. I wouldn't recommend 9 volt batteries unless you really need that voltage and form factor. They don't have very good battery life. When using 9 Volts to supply 6 Volts a lot of the extra voltage is wasted as heat.
USB Cables $0.85: Needed for programming Arduino. A longer USB may be more convenient.
Custom laser cut wheels: I didn't want to buy 30 wheels for over a dollar each. There was scrap acrylic available so I took advantage of that. Look around for servo wheels and see what looks good. They will probably be better than lasercut wheels.
Total cost was between $45 - $50 per robot.
Challenges:
Lack of traction because it is too light weight.
Breadboards and jumper wires come loose.
Servo's not centering. More expensive servo's may work better.
Doesn't have a good turning radius as described above.
Robots do not obey the 3 laws of robotics due to their limited understanding of the English language. Does anyone have an Arduino library for this?
Tuesday, October 15, 2013
Come out this Thursday 5:30 - 8 pm for Robots, and Arduino. Last week 3 kids and I worked on making half size versions of my music instrument out of robot guts. That was great spontaneous making at HeatSync Labs.
Also on Wednesday from 6-8 pm I will be at THINKspot for a hands on introduction to robot basics. They have some cool design tools and 3d printer, but they are trying to get even more hands on making in their space. Come have fun.
Also on Wednesday from 6-8 pm I will be at THINKspot for a hands on introduction to robot basics. They have some cool design tools and 3d printer, but they are trying to get even more hands on making in their space. Come have fun.
Friday, September 20, 2013
Join me for robot fun at the following events.
Tuesday 09/24/2013 6-7 pm - Hacker Haven at Phoenix Burton Barr Library
Saturday 09/28/2013 noon to 6 pm - Making robots at HeatSync Labs
Thursday 10/17/2013 5:30 - 7:55 pm - Queen Creek Branch Library
Tuesday 09/24/2013 6-7 pm - Hacker Haven at Phoenix Burton Barr Library
Saturday 09/28/2013 noon to 6 pm - Making robots at HeatSync Labs
Thursday 10/17/2013 5:30 - 7:55 pm - Queen Creek Branch Library
Yesterdays robotics night went really well. The goal is to have people learning with the Arduino examples as well as having enough interesting stuff for those who already have experience. That is what we had.
A few of the group are engineers that brought their kids to learn more about Arduino. One experience Arduino user was able to try out sensors from the kit I have.
We are also getting attentions of other possible young engineers and It's encouraging to bring things they would otherwise not have immediate access to.
Thursday, September 12, 2013
Backward is the new forward
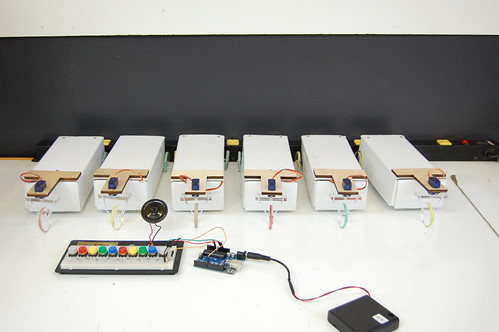
While updating updating the Robox I found steering more consistent when driving them backwards. So backward will be the new forward. I've added wooden steering supports so they hold up better.
I'm also working on a design for a more durable wooden or acrylic body we can laser cut. I will be leaving places for additional sensors. Others have suggested line following, or having robots find and follow other robots. So placement is being left for trying those out.
So here they are with the new wooden supports.
 In front is a music instrument based on Arduino. It is able to play
multiple octaves by navigating up and down octaves with the gray keys on either side. I want to demonstrate that Arduino are capable of doing more than making servo's move. I will have it at next weeks event Thursday 09/19/2013 from 5:30 until 7:55.
In front is a music instrument based on Arduino. It is able to play
multiple octaves by navigating up and down octaves with the gray keys on either side. I want to demonstrate that Arduino are capable of doing more than making servo's move. I will have it at next weeks event Thursday 09/19/2013 from 5:30 until 7:55.
I'm also working on a design for a more durable wooden or acrylic body we can laser cut. I will be leaving places for additional sensors. Others have suggested line following, or having robots find and follow other robots. So placement is being left for trying those out.
So here they are with the new wooden supports.
Subscribe to:
Posts (Atom)